ContribuTour
A tour covering tools, workflows, and best practices for contributing to open source projects.

Preface
When I first started with open-source, I was confused. What are patch files? Who should I send them to? How do I send them? Where do developers communicate? And why do those emails look so cryptic?
These tools and workflows form a culture among open-source contributors. In this short tour, I will clear up these confusions. If you’re in a similar situation, you may find it useful. My focus is on the Linux kernel source code—the largest and most professional open-source ecosystem. Many other projects have adopted parts of its workflow.
There are many tutorials online, with the original one being All development-process docs. However, none present the essentials concisely with examples. So, let’s begin this tour.
What You Won’t Learn Here
- Programming
- Git
- Debugging
We won’t cover these topics, as there are countless resources available. For example, Linux Kernel Programming and Linux Kernel Debugging are excellent references.
I also have two tutorials on Git and GDB called EatGit and GDBugging. Feel free to check them out if you’re interested.
What You Will Learn Here
- Proper Setup
- Why Patch Files
- Checking for Style
- Finding Maintainers
- Sending Emails
- Replying to Emails
- Sending a v2 of Your Patch
- Writing Cover Letters
Here, I will take you through what happens after you’ve finished coding—when you want to share your work with the community and receive feedback.
Proper Setup
After editing your code, you need to build and test it. Each codebase has its own methods, usually documented. For the Linux kernel, make and its various build targets handle OS configuration, building, and installation. Below is a concise guide to building the Linux kernel.
- Set Up a Test Machine
- Install Build Dependencies
- Configure the Kernel
- Build the Kernel
- Install the Kernel
Set Up a Test Machine
The setup depends on the part of the code you’re testing. If you’re working on a device driver, you’ll need a machine that can access the target device, making virtual machines less suitable. You may want to explore the Armbian Linux Build Framework, The Yocto Project, or Buildroot.
For native builds, I set up a clean Ubuntu Server virtual machine and connect to it using the VSCode Remote Development extension. After installing dependencies and cloning the Linux kernel repository, I save the setup and power off the machine. From then on, I clone this machine whenever needed and work inside the clone.
When building for my OrangePi 5, I cross-compile the kernel, move it to the OrangePi boot directory, and update the symbolic links.
The kernel’s command-line parameters list all the arguments the kernel accepts. To see the arguments of the current run, use
cat /proc/cmdline.
Install Build Dependencies
Linux Kernel Programming provides a useful script to set up all the dependencies needed for the topics covered in the book. Here is a portion of it:
1
2
3
4
5
6
7
8
9
10
11
12
13
14
15
16
17
18
19
20
21
22
sudo apt-get update
sudo apt-get upgrade

# ensure basic pkgs are installed!
sudo apt-get install -y gcc make perl

# packages typically required for kernel build
sudo apt-get install -y \
  asciidoc binutils-dev bison build-essential flex libncurses5-dev ncurses-dev \
  libelf-dev libssl-dev openssl pahole tar util-linux xz-utils zstd

# other packages...
sudo apt-get install -y \
  bc bpfcc-tools bsdextrautils tldr-py trace-cmd tree tuna virt-what yad \
  clang coccinelle coreutils cppcheck cscope curl exuberant-ctags \
  fakeroot flawfinder git gnuplot hwloc indent kmod libnuma-dev \
  man-db net-tools numactl perf-tools-unstable procps psmisc \
  linux-headers-$(uname -r) linux-tools-$(uname -r) \
  rt-tests smem sparse stress stress-ng sysfsutils

# clean up
sudo apt-get autoremove
And finally, clone a suitable codebase from Kernel.org git repositories:
1
git clone https://git.kernel.org/pub/scm/linux/kernel/git/torvalds/linux.git
Configure the Kernel
To build a kernel quickly, I use the following commands:
1
2
3
4
5
6
7
# Clean everything
make mrproper
# Build only with currently loaded modules
# Remove all custom modules if any
make localmodconfig
# Add or remove specific options
make menuconfig
For cross-compiling on an SoC, use the same commands with a cross-compiler prefix:
1
2
3
4
5
6
7
# For 32/64-bit
KERNEL=kernel8
# Copy the original configuration
scp <user>@<address>:/boot/config* .config
# Configure the kernel based on the original one
make ARCH=arm64 olddefconfig
make ARCH=arm64 menuconfig
The Linux kernel documentation for Raspberry Pi provides a thorough guide on kernel builds.
There is a tool inside the Linux source code that allows you to change any configuration with a single command:
scripts/config --enable CONFIG_DEBUG_KERNEL
I use the following script to enable many debugging capabilities inside the kernel during the configuration:
1
2
3
4
5
6
7
8
9
10
11
12
13
14
15
16
17
18
19
20
21
22
23
24
25
26
27
28
29
30
31
32
33
34
35
36
37
38
39
40
#!/bin/bash
# Generic kernel debugging instruments
scripts/config --enable CONFIG_DEBUG_KERNEL
scripts/config --enable CONFIG_DEBUG_INFO
scripts/config --enable CONFIG_DEBUG_MISC
scripts/config --enable CONFIG_MAGIC_SYSRQ
scripts/config --enable CONFIG_DEBUG_FS
scripts/config --enable CONFIG_KGDB
scripts/config --enable CONFIG_UBSAN
scripts/config --enable CONFIG_KCSAN
# Memory debugging
scripts/config --enable CONFIG_DEBUG_PAGEALLOC
scripts/config --enable CONFIG_DEBUG_PAGEALLOC_ENABLE_DEFAULT
scripts/config --enable CONFIG_SLUB_DEBUG
scripts/config --enable CONFIG_DEBUG_MEMORY_INIT
scripts/config --enable CONFIG_KASAN
scripts/config --enable CONFIG_DEBUG_SHIRQ
scripts/config --enable CONFIG_SCHED_STACK_END_CHECK
scripts/config --enable CONFIG_DEBUG_PREEMPT
# Lock debugging
scripts/config --enable CONFIG_PROVE_LOCKING
scripts/config --enable CONFIG_RCU_EXPERT
scripts/config --enable CONFIG_LOCK_STAT
scripts/config --enable CONFIG_DEBUG_RT_MUTEXES
scripts/config --enable CONFIG_DEBUG_MUTEXES
scripts/config --enable CONFIG_DEBUG_SPINLOCK
scripts/config --enable CONFIG_DEBUG_RWSEMS
scripts/config --enable CONFIG_DEBUG_LOCK_ALLOC
scripts/config --enable CONFIG_DEBUG_ATOMIC_SLEEP
scripts/config --enable CONFIG_PROVE_RCU_LIST
scripts/config --enable CONFIG_DEBUG_OBJECTS_RCU_HEAD
scripts/config --enable CONFIG_BUG_ON_DATA_CORRUPTION
scripts/config --enable CONFIG_STACKTRACE
scripts/config --enable CONFIG_DEBUG_BUGVERBOSE
scripts/config --enable CONFIG_FTRACE
scripts/config --enable CONFIG_FUNCTION_TRACER
scripts/config --enable CONFIG_FUNCTION_GRAPH_TRACER
# Arch specific
scripts/config --enable CONFIG_FRAME_POINTER
scripts/config --enable CONFIG_STACK_VALIDATION
While inside
make menuconfig, you can use/to search for a configuration. Then, press1(or the appropriate number) to go from the search screen to the menu item for the first entry found.
Make sure the
CONFIG_SYSTEM_REVOCATION_KEYSis empty.
Build the Kernel
This is the easy part:
1
2
# Actual build
make -j$(nproc) all
When cross-compiling:
1
2
3
4
5
6
7
# Actual build
make -j$(nproc) ARCH=arm64 CROSS_COMPILE=aarch64-linux-gnu- all
# Package the generated artifacts
make -j$(nproc) ARCH=arm64 CROSS_COMPILE=aarch64-linux-gnu- deb-pkg
# Copy the new kernel to the SoC for installation later
cd ..
scp *.deb <user>@<address>:/home/<user>
Install the Kernel
For a native build:
1
2
3
4
# Install modules
sudo make modules_install
# Install the kernel and update GRUB
sudo make install
Or on your SoC:
1
2
# Install the new kernel
sudo dpkg -i *.deb
If GRUB is your bootloader, you can modify its behavior by editing the file at /etc/default/grub:
1
2
3
4
5
6
# Example edits:
GRUB_TIMEOUT_STYLE=menu
GRUB_TIMEOUT=3
GRUB_SAVEDEFAULT=true
GRUB_DEFAULT=saved
GRUB_CMDLINE_LINUX=""
Don’t forget to run sudo update-grub. Below are some useful kernel command-line arguments:
- To enable kernel debug messages:
debug - To output loglevels less than
n:loglevel=n - To let the kernel be preempted:
preempt=full - To isolate CPUs from the scheduler:
isolcpus=0,4-8 - To boot into single-user mode:
single
If U-Boot is your bootloader, connect your SoC’s serial port to your PC. During boot, press any key on the keyboard to access the U-Boot command line. Once there, you can add kernel command-line arguments like this:
setenv extraargs ${extraargs} systemd.unit=rescue.target; env print;
Why Patch Files
Patch files are portable and plain text, which means the community doesn’t need to rely on a provider like GitHub to track branches and merge pull requests. When patch files are sent as plain text emails, the review and back-and-forth communication can also occur with any email client.
When your testing is complete and you have committed your work, create a patch file with:
1
git format-patch origin/master -o ../
See the guidelines for The canonical patch format and how to Describe your changes.
Checking for Style
Make sure to Style-check your changes before submitting any patches. To style-check your changes without creating any patch files:
1
2
git checkout feat
git format-patch origin/master --stdout | ./scripts/checkpatch.pl
Use
git commit --amend -sto sign your commit.
Finding Maintainers
We use another tool in the scripts subfolder of the Linux source code to find relevant maintainers for our patch. This tool checks which files have been modified in the commit and prints the maintainers’ names and email addresses.
1
2
git checkout feat
git format-patch origin/master --stdout | ./scripts/get_maintainer.pl
Submit Your Patch
All that to just send an email! Don’t worry, Git has you covered:
1
2
git send-email --to=maintainer1@linux.com --cc=maintainer2@linux.com \
  --cc=maintainer3@linux.com master..feat
Before sending emails with Git, you need to install git-email and configure it with your email provider’s server information. The following shows how to do it for Gmail:
1
2
3
4
5
6
7
# Install git-email
sudo apt-get install git-email
# Use Gmail as the SMTP server
git config --global sendemail.smtpEncryption tls
git config --global sendemail.smtpServer smtp.gmail.com
git config --global sendemail.smtpUser yourname@gmail.com
git config --global sendemail.smtpServerPort 587
It’s not over yet. You need to enable two-step verification on Gmail and generate an Application Password to use when Git asks for it.
Have a look at the git-send-email documentation.
Sending a v2 of Your Patch
It is very likely that your patch will not be accepted on the first submission. When you receive an email with comments from the maintainer, apply those changes to your commits and resend the patch files. Do not create new commits. Instead, use Interactive Rebase. Once done, use the --annotate parameter when sending the emails and manually edit the subject line to add v2 (and so on) to the [Patch] part.
1
2
git send-email --annotate --to=maintainer1@linux.com --cc=maintainer2@linux.com \
  --cc=maintainer3@linux.com master..feat
See The canonical patch format for more instructions.
Writing Cover Letters
Sometimes you need to provide explanations that don’t belong in the commit message but can make your decisions in the code clearer to others. You can instruct git-send-email to send an extra email before any patches, known as a cover letter. To do that, add the --cover-letter parameter when sending the emails. Replace *** SUBJECT HERE *** and *** BLURB HERE *** with the appropriate content.
1
2
git send-email --annotate --cover-letter --to=maintainer1@linux.com \
  --cc=maintainer2@linux.com --cc=maintainer3@linux.com master..feat
Replying to Emails
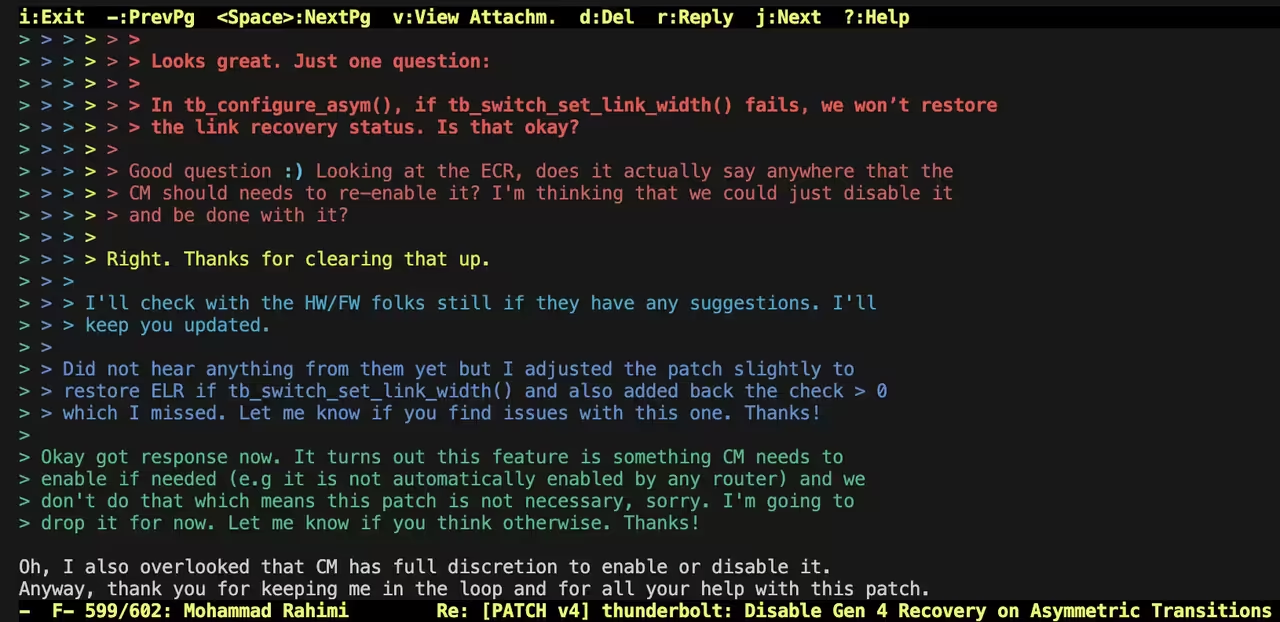
The maintainer will open your patch in their email client, add comments between the lines of your patch, and reply in plain text format.
1
2
3
4
5
6
7
8
9
10
11
12
13
14
15
> > > +
> > > +/**
> > > + * usb4_disable_lrf() - Disable Link Recovery flow up to host router
> > > + * @sw: Router to start
> > > + *
> > > + * Disables Link Recovery flow from @sw up to the host router.
> > > + * Returns true if any Link Recovery flow was disabled. This
> > > + * can be used to figure out whether the link was setup by us
> > > + * or the boot firmware so we don't accidentally enable them if
> > > + * they were not enabled during discovery.
> >
> > Okay I think you copied the CLx part here, no? How did you test this?
> >
>
> The way we should handle Link Recovery seems quite similar to CL states.
That’s why regular email clients are not ideal for viewing these emails, and you should avoid replying to them using services like Gmail’s web application. Instead, install a terminal-based email client. One example is neomutt, which I will explain how to set up.
To properly set up neomutt, create two files: ~/.config/mutt/muttrc and ~/.config/mutt/colors.muttrc, with the following content:
1
2
3
4
5
6
7
8
9
10
11
12
13
14
15
16
17
18
19
20
21
# .muttrc
set imap_user = 'yourname@gmail.com'
set imap_pass = 'your_app_password'
set spoolfile = imaps://imap.gmail.com/INBOX
set folder = imaps://imap.gmail.com/
set record="imaps://imap.gmail.com/[Gmail]/Sent Mail"
set postponed="imaps://imap.gmail.com/[Gmail]/Drafts"
set trash="imaps://imap.gmail.com/[Gmail]/Trash"
set mbox="imaps://imap.gmail.com/[Gmail]/All Mail"
mailboxes =INBOX =[Gmail]/Sent\ Mail =[Gmail]/Drafts =[Gmail]/Spam =[Gmail]/Trash =[Gmail]/All\ Mail
set smtp_url = "smtp://yourname@smtp.gmail.com:587/"
set smtp_pass = $imap_pass
set ssl_force_tls = yes
set edit_headers = yes
set charset = UTF-8
unset use_domain
set realname = "Your Name"
set from = "yourname@gmail.com"
set use_from = yes
set envelope_from=yes
source colors.muttrc
For colors.muttrc, copy the content from here. Then run the neomutt.
It takes some time to get used to
neomuttshortcuts. The following is a list of the most common ones I use:
cto change mailboxspaceto go down one page-To go up one pageEnter/Returnto go down one lineBackspace/Deleteto go up one line
To see a patch email with proper text highlighting:
- Choose an email containing a patch. Use the ‘Enter/Return’ key to open it.
- Press
vto view attachments.- Press
|to pipe the content tovim.- Use
vim -when asked with thePipe to:question.- In
vim, use the:set filetype=diffcommand to highlight the text properly.- Use
:qa!to quit.
Ideas on Where to Start
Follow the discussions between developers to find the hotspots of development in the Linux kernel. If you are familiar with a protocol, find the latest specification and cross-reference the source code with the requirements of that specification. Drivers are updated continuously, so they are a good place to start. There are many GNU projects out there—follow their bug reporting channels and see if you can fix any of them. It takes some time to find your footing, but once you do, you’ll find this whole process to be a very rich learning experience.